
TuneCable Apple Music Converter
Premiere Pro is a professional video editing suite, which is mainly used by professionals for editing long videos like movies, advertisements, documentaries, etc. Unlike CapCut, a handy and light video editor that is easy to use for the masses, Premiere Pro requires a steeper learning curve. However, many self-media content creators are not stumped by it. In recent years, some content creators who try to precisely fine-tune every clip frame by frame for high-quality video output have been working hard on learning to use this video editor.
The topic of how to add iTunes or Apple Music songs to Premiere Pro for video editing has sparked numerous responses from the Adobe Community. Many users reported that the downloaded iTunes or Apple Music tracks are grayed out, preventing them from adding the music to Premiere. How can we add Apple Music to Premiere Pro? If you are also concerned about this problem, then follow us to resolve it now.
First and foremost, the answer is YES. As seen in the Adobe Community forums, many users have encountered difficulties when attempting to import iTunes or Apple Music tracks into Premiere Pro. Given these challenges, you might question whether importing Apple Music tracks into Premiere Pro is even feasible. But thankfully, we can make it with the help of a third-party tool like TuneCable iMusic Converter.
At this point, you may wonder why we need TuneCable. As mentioned at the beginning, when you try to add the downloaded songs from iTunes or Apple Music, you might find that the files are greyed out and can not be added to Premiere Pro. The most direct reason for this situation is that the format of the selected file is not supported for import into Premiere Pro.
Usually, the music downloaded with an Apple Music subscription on your device is saved in M4P (MPEG-4 Protected) format, a unique audio format created by Apple and designed for DRM (Digital Rights Management) protection. This encrypted audio file format can only be played on specific official Apple platforms such as Apple Music and iTunes. Other software, like Premiere Pro, cannot load M4P files. This is why Premiere Pro users fail to add music downloaded from iTunes or Apple Music to Premiere.
Don't worry. TuneCable iMusic Converter will help you remove all obstacles. This professional music converter will help you convert music from your Apple Music library or iTunes library to the formats that are supported in Premiere Pro. Let's learn more details in the next part!
TuneCable iMusic Converter is born to download songs, albums, playlists, audiobooks, podcasts, etc from your Apple Music or iTunes account to your local PC. Bypassing the DRM restrictions, TuneCable iMusic Converter will save all the downloaded music files as MP3, AAC, FLAC, AIFF, WAV, or ALAC format according to your decision instead of M4P. With the help of TuneCable, you can add the downloaded Apple Music or iTunes audio files to any video editor like Premiere Pro, Final Cut Pro, and CapCut, for enhanced audiovisual outcomes.
Key Features of TuneCable iMusic Converter:
Here is how to download Apple Music tracks locally using TuneCable iMusic Converter:
Step 1 Launch TuneCable iMusic Converter and Log in to Your Apple Account
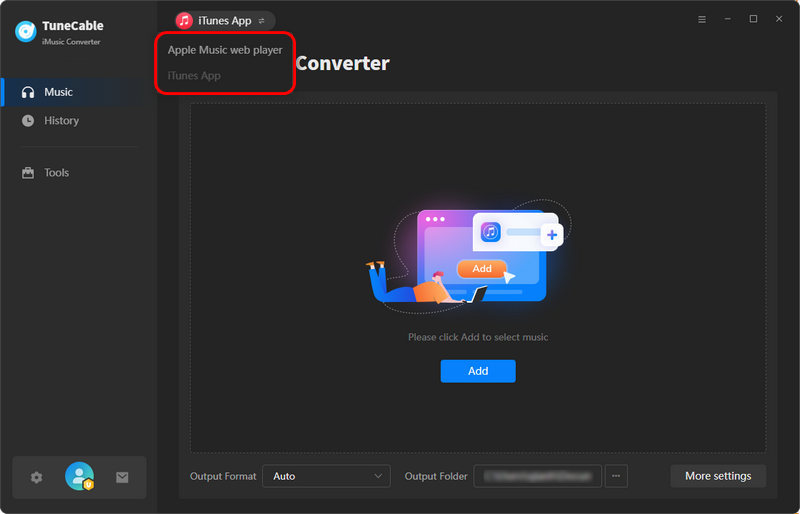
TuneCable iMusic Converter supports downloading music from both the Apple Music or iTunes app and the Apple Music web player. You can switch the download source by clicking the "iTunes/Music App" or "Apple Music web player" button located in the drop-down tab on the top bar. Then, make sure to log in to your Apple ID.
Note:
1. If you are running the Windows version of TuneCable iMusic Converter, you can download music from the iTunes app or Apple Music web player. Both the app mode and web player mode support downloading at up to 10x speed.
2. When running the Mac version, you have the option to download music from the Apple Music app or the web player. The web player mode supports downloading at up to 10x while the app mode only supports 1x conversion speed.
3. If you are running the Mac version and prefer higher output quality, it is recommended to choose the "Music App" source.
Step 2 Add Apple Music/iTunes Song to TuneCable
The adding-song procedure is a bit different between adding from the iTunes/Music app and the Apple Music web player.
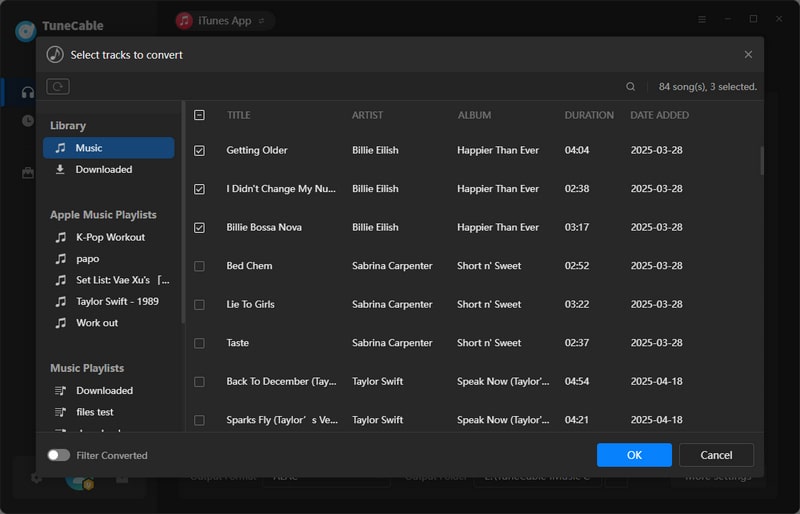
When adding from the iTunes or Music app, you need to click the "Add" button on the center panel of the program interface to load the music, playlists, podcasts, etc, within your library. Then, select the tracks from the list and hit "OK" to move them to the download list.
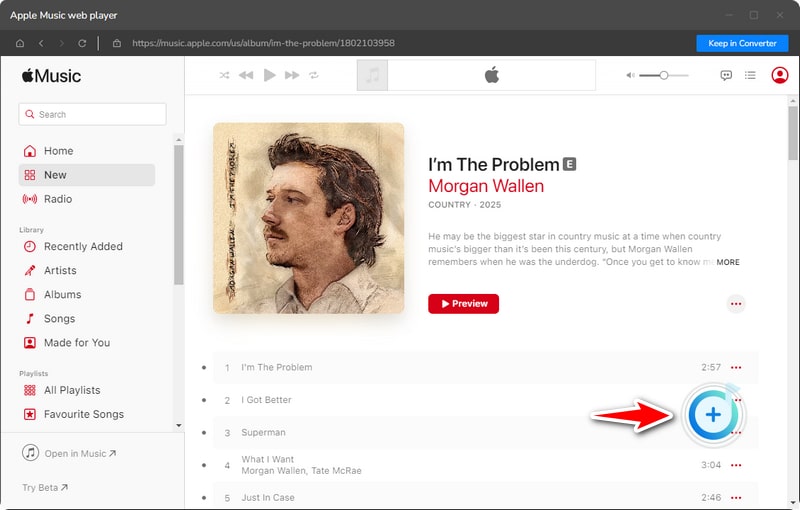
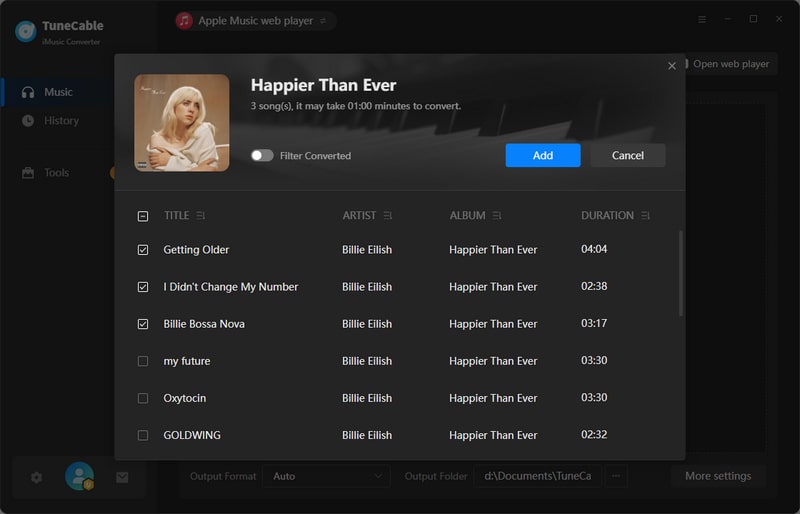
When adding songs from the Apple Music web player, you may find the needed music first. Then tap on the blue "Click to add" button to load the downloadable songs on the current page. Then, tick your favorite tracks from the pop-up and click the "Add" button to finish adding Apple Music tracks.
Step 3 Customize Your Output Settings
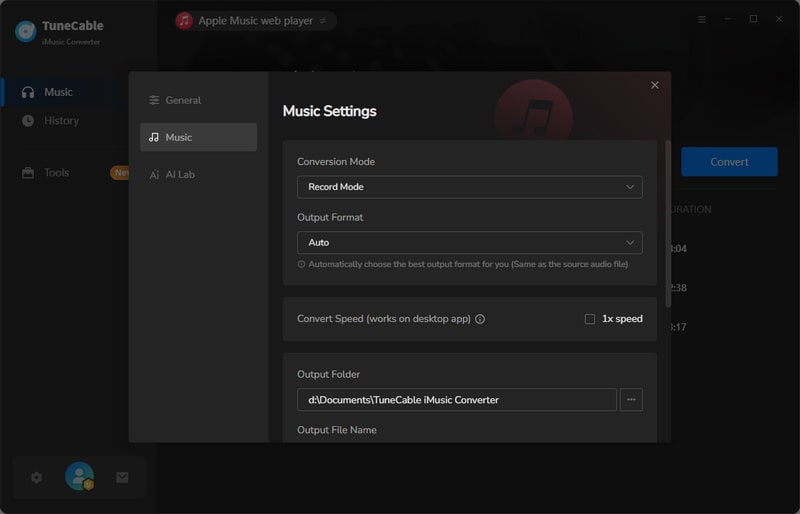
Move the mouse to the lower left corner and click the gear icon to go to the "Settings" section, where you can set the output format, bit rate/bit depth, sample rate, conversion mode, and more. Remember to select an audio format supported by Premiere Pro in order to add Apple Music to Premiere Pro successfully. We recommend MP3, AIFF, WAV, and AAC, which are compatible with most versions of Premiere Pro. Some versions of Premiere Pro support importing FLAC or ALAC audio, but you may need to install a plug-in or script to support it.
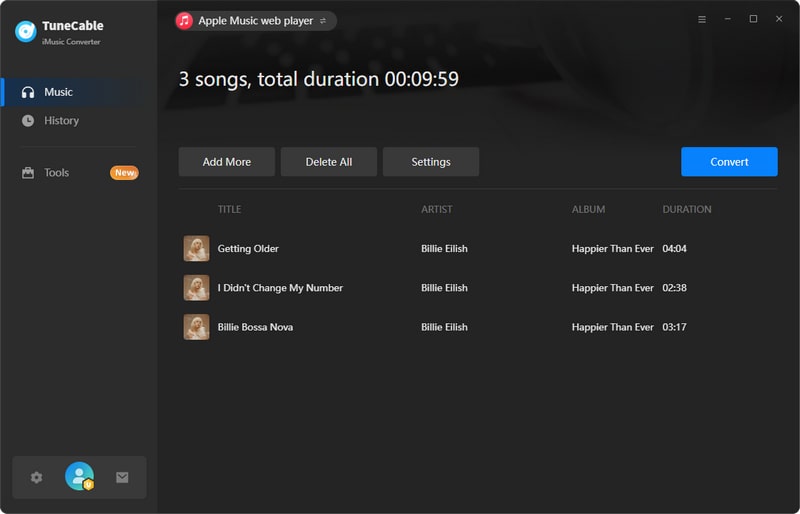
Step 4 Convert and Check the Downloaded Apple Music Song
After modifying the output parameters, simply click the "Convert" button to start the downloading process. TuneCable iMusic Converter will download your favorite songs to your Windows or Mac computer at the fastest speed, according to the network status. With a maximum conversion speed of 10x, you don't have to wait long.
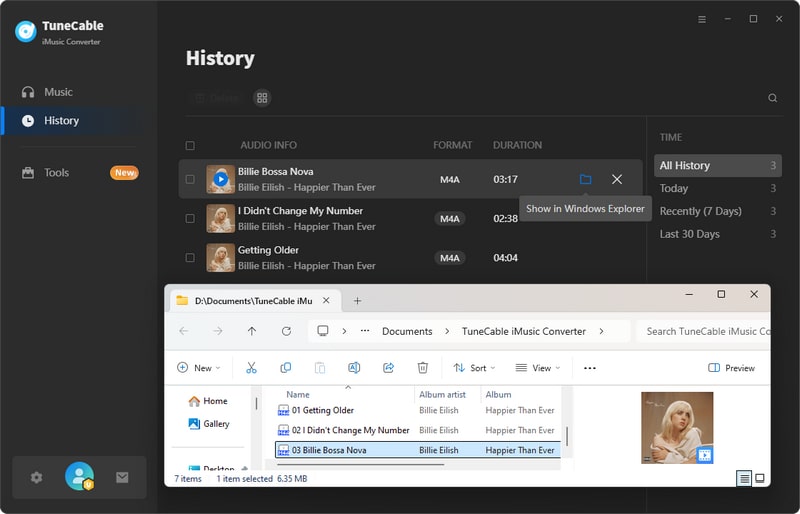
Normally, after the download is complete, the output folder will automatically pop up for you to view the downloaded items. You can also go to the "History" page to view your download history. By clicking the folder icon to the right of the song, you will be led directly to the local location of the music file. This way, you can directly find the corresponding music files and add Apple Music to Premiere Pro by dragging and dropping later.
After converting songs from Apple Music or iTunes to a format supported by Premiere Pro, you can now easily import them into Premiere Pro for video editing. You may refer to the following methods to add them to Premiere Pro:
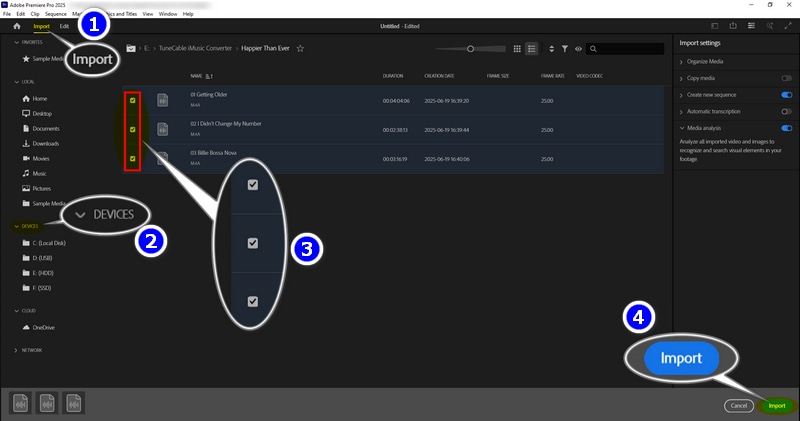
Step 1 Launch Premiere Pro and create a new video project.
Step 2 Click "Import" → "DEVICES". Then, find the location where the converted Apple Music or iTunes music files are saved.
Step 3 Check the downloaded music you need to add. Finally, click the blue "Import" button below to add Apple Music to Premiere Pro.
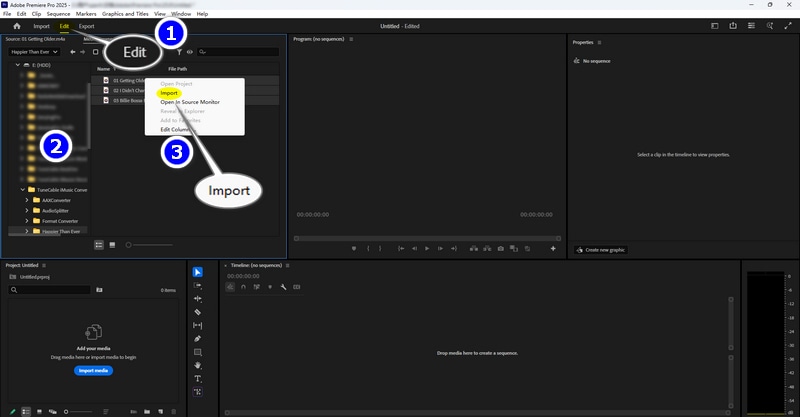
Step 1 Launch Premiere Pro and create a new video project.
Step 2 Click "Edit" in the upper left corner. Then, go to the location bar on the left and find the output folder location where the downloaded Apple Music tracks are saved.
Step 3 Select the tracks you want to add to Premiere Pro and right-click and click "Import".
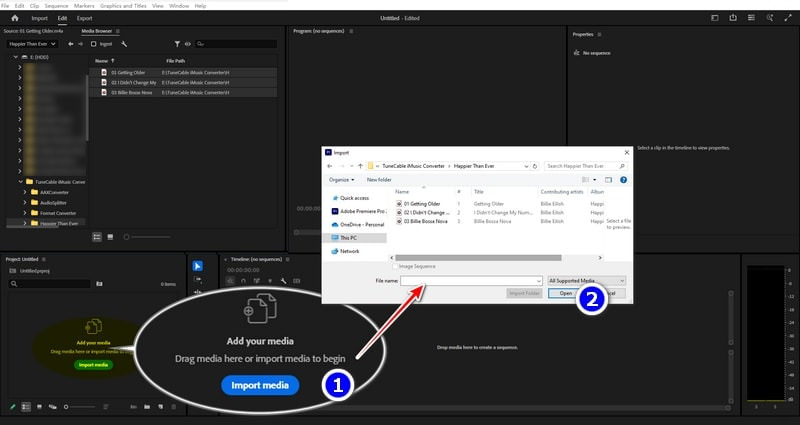
Step 1 Launch Premiere Pro and create a new video project.
Step 2 Click the "Import media" button in the lower left corner. Select the Apple Music or iTunes tracks you want to import into Premiere Pro, and then click "Open".
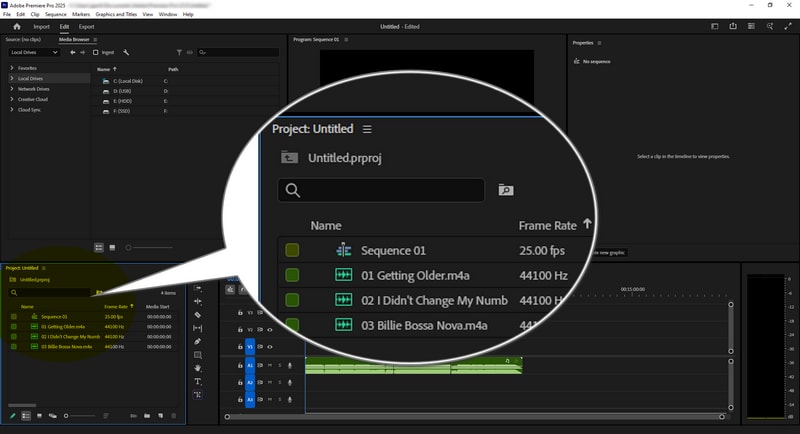
No matter which method you use, you will eventually be able to see all the Apple Music songs added to the Premiere Pro media library. Then, simply drag and drop music from your library onto the track to edit it.
No. But you can use TuneCable iMusic Converter to download the music from your Apple Music Library to MP3, AAC, AIFF, or WAV format first, and then import them into Premiere Pro.
Partially supported. Supported audio formats on iTunes include AAC, MP3, ALAC, WAV, AIFF, M4P, etc. However, Premiere Pro does not support M4P. Hence, if your iTunes files are saved in M4P format, you need to use TuneCable iMusic Converter to download them as MP3, AAC, AIFF, ALAC, or WAV first, and then import them into Premiere Pro.
FLAC and ALAC are not supported in some versions. Some old versions of Premiere Pro do not have a built-in decoder to process ALAC or FLAC files. When you try to drag and drop ALAC or FLAC files to Premiere Pro, a 🚫 symbol will appear in the program, indicating that the files cannot be imported. It is recommended to convert the Apple Music files to AIFF or WAV first to get as high quality as possible, like ALAC or FLAC files. You may need TuneCable iMusic Converter to make it.
In this article, we discuss a popular topic in Adobe Community - "How to Add Music from iTunes or Apple Music to Premiere Pro?". This article not only explains in detail the reasons why many users failed to import Apple Music to Premiere Pro, but also provides a successful and feasible solution. As mentioned above, before importing Apple Music files to Premiere Pro, you must make sure that the file format is supported. With TuneCable iMusic Converter, you can download and convert Apple Music tracks or iTunes M4P files to MP3, WAV, AIFF, and other audio formats supported by Premiere Pro. Finally, you can successfully use Apple Music songs on Premiere Pro for audio and video editing.
With TuneCable, you can also transfer the downloaded files to various software like Final Cut Pro, Rekordbox, and GarageBand for further processing. Click the button below to download and install it on your computer to give it a try now!
 What's next? Download TuneCable iMusic Converter now!
Ava Morrison | Senior Writer


