
 >
How To >
Music Tips >
>
How To >
Music Tips >
CapCut is a free, versatile video editing software developed by ByteDance. This software is fast, intuitive, and socially friendly, and has become one of the preferred video editing tools for individual creators. If you are a content creator or video editing enthusiast who is making some video content and needs to add background music to your videos, you might give CapCut a try. With CapCut, you can add BGM to your video with audio from CapCut's built-in music library, YouTube's audio library, Free Music Archive, and other platforms. In this article, we will focus on how to add YouTube Music to CapCut as BGM.
Audio is an indispensable element in video editing. CapCut provides users with a variety of audio options, as follows:
1. CapCut built-in genuine music library (copyright-free): The audio within the built-in CapCut music library is suitable for making some hot shorts. The optional choices include common soundtracks for film and television editing, pop, electronic music, hip-hop, rock music, or exclusive music for VIP users.
2. Sound Effects: Sound effects are used to enhance the atmosphere of the video. Optional audio includes ambient sound, special effects sound, animation sound, etc.
3. Recording & Dubbing: Recording and dubbing are suitable for narration, commentary, ASMR, etc. CapCut has a recording function, through which you can convert your voice into audio and add it to the video for narration. You can also add AI dubbing audio to your videos on CapCut via the text-to-speech feature.
4. External audio (note about copyright issue): CapCut allows you to import local audio as background music, sound effects, etc. For example, you can get royalty-free music from your YouTube Studio and add it to CapCut.
Regarding how to import YouTube music to CapCut, we first need to understand that CapCut does not have the function of directly importing YouTube Music songs. To achieve this goal, we need to first download the audio from YouTube Music to the local computer and then import the audio into CapCut. Next, we will explain it to you in detail in parts.
Free users of YouTube Music are not able to access the offline listening feature. Moreover, although Premium subscribers can use the so-called "download" function, they can not get the "real audio files" as the downloaded songs will be encrypted (DRM protection) and can only be played in the YouTube Music App. In short, downloaded YouTube songs can not be exported as general audio files (such as MP3 files). However, if you want to import YouTube Music audio files to CapCut, you must make sure to first download the songs from YouTube Music as unencrypted audio files.
TuneCable BeatOne has the extraordinary ability to solve this problem. Equipped with high-end technology, TuneCable can losslessly record audio from popular music platforms such as YouTube Music, Spotify, Apple Music, etc., as unencrypted files. For users who want to use the downloaded music files for other purposes, you can also choose output formats such as MP3, AAC, ALAC, FLAC, WAV, and AIFF. It not only supports downloading YouTube music with a few clicks, but also supports downloading the corresponding music videos. With handy tools like Audio Editor, AI Audio Splitter, and Format Converter, you can even edit the audio files as needed before importing the edited YouTube Music files to CapCut.

TuneCable BeatOne
Here are the detailed steps to download music from YouTube Music to your local PC with TuneCable BeatOne.
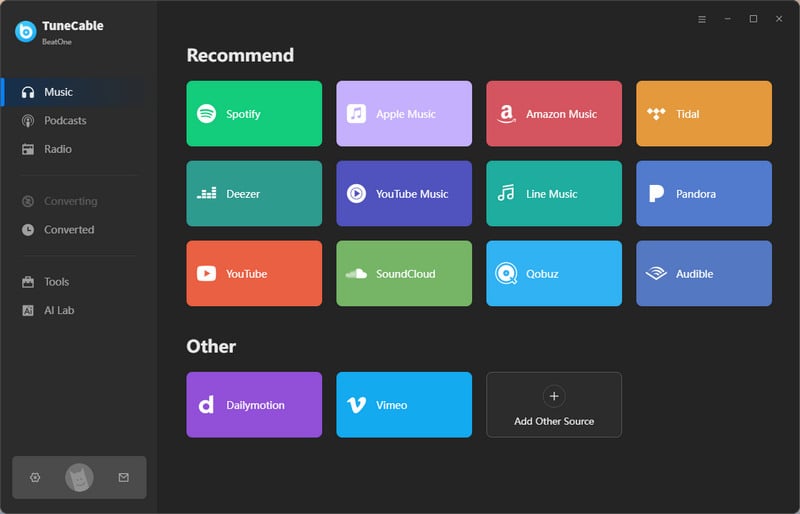
Step 1 Download and install TuneCable BeatOne on your Windows or Mac computer, and launch it. TuneCable provides a wealth of download sources. Please find "YouTube Music" from the many choices and click it to initiate the built-in YouTube Music web player. Then, log in to your YouTube Music account following the on-screen instructions.
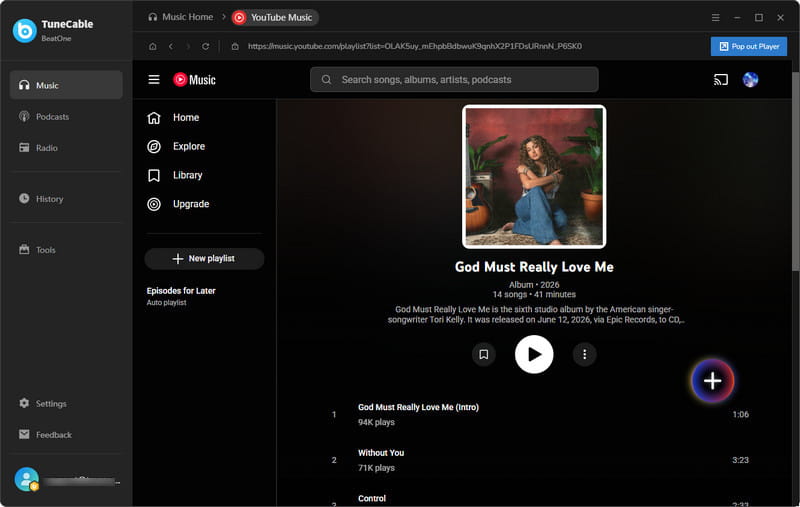
Step 2 In the YouTube Music web player, find the track you want to use as background music for your video. You can open an album or playlist. Then, click the "Click to add" button in the lower right corner of the program interface.
Extra Tips: Currently, the latest version of TuneCable UI supports keeping the YouTube web player in Converter or popping out as an independent window. You can decide the way the web player shows by clicking "Keep in Converter" or "Pop out Player".
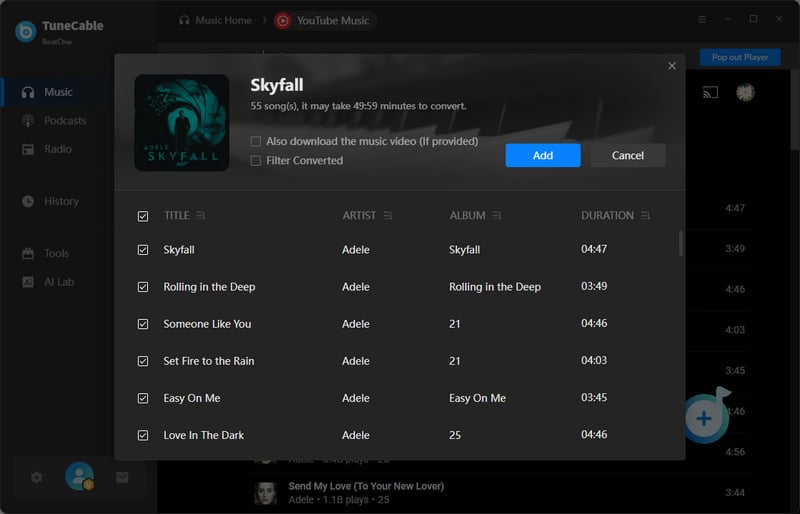
After the parsing is completed, a small window will pop up for you to check the content to download. Finally, tap on the "Add" button to move them to the download list.
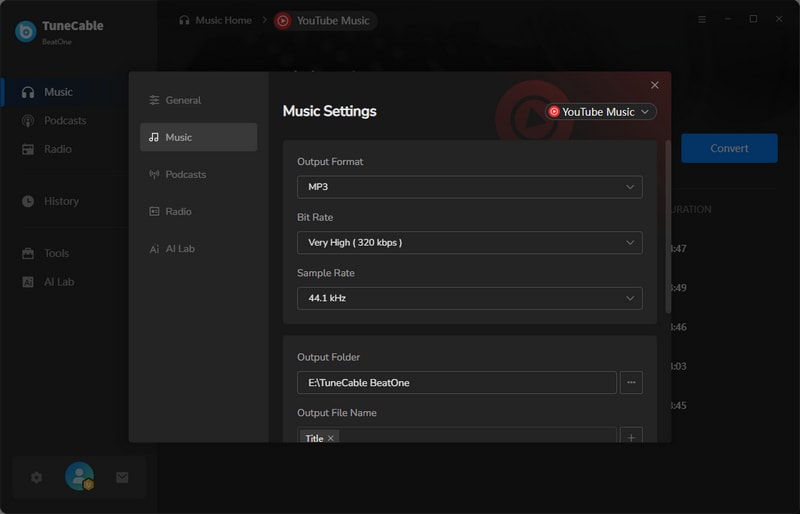
Step 3 Move your mouse to the lower left corner of the program interface. Click the gear icon to enter the Settings interface to customize the output parameters. TuneCable BeatOne offers six output formats, including MP3, AAC, ALAC, FLAC, AIFF, and WAV. As for which format is suitable for the audio files that are inserted into CapCut, we recommend MP3, as it takes up less storage space and has moderate output sound quality. If you prefer higher sound quality, you may choose lossless audio output formats like FLAC and WAV.
In addition, if you need to download many songs from YouTube Music at one time, we recommend that you create a new folder and set it as the output folder. Finally, you can batch import the downloaded YouTube Music tracks to CapCut at once.
Step 4 TuneCable supports batch downloading tracks from different albums or playlists. Simply click "Add More" and repeat adding tracks to the download list. Next, click "Convert" to start downloading music to your local computer.
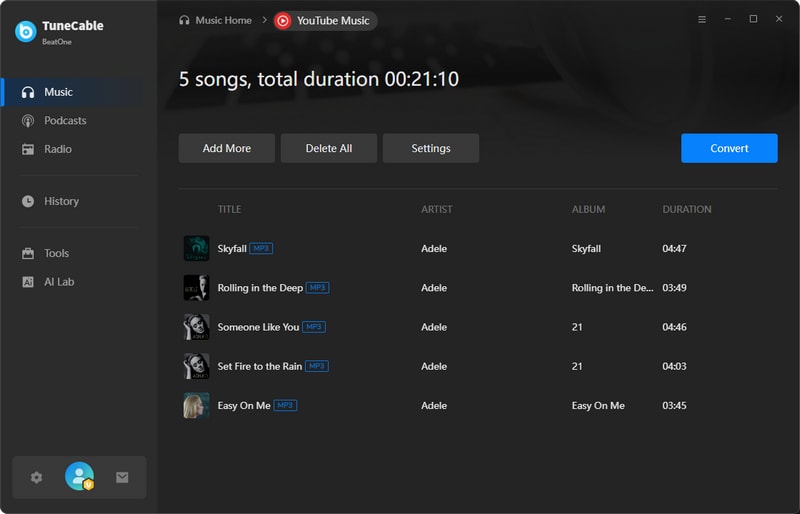
Step 5 TuneCable can download at up to 10x faster speeds, so the download process will be completed quickly. Normally, the output folder will pop up immediately after downloading is completed, so that you can view the downloaded YouTube tracks conveniently.
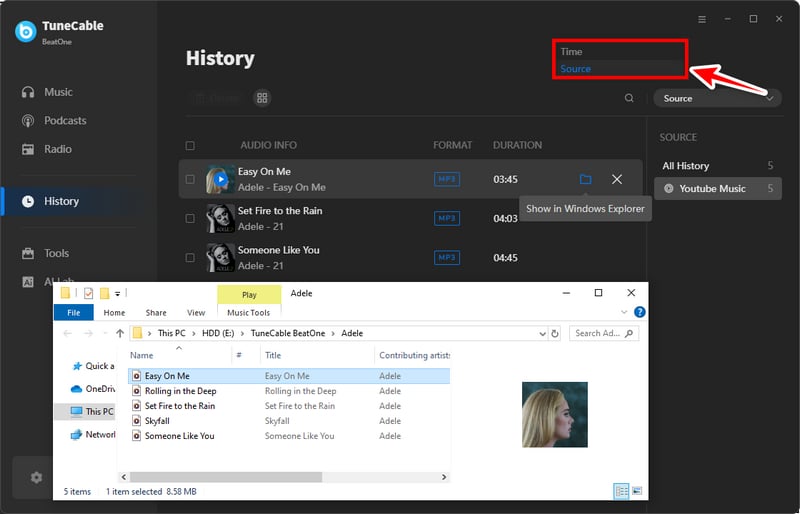
You can also go to the "History" section to view your download history. You may click the drop-down menu on the right and select "Source" > "YouTube Music", where you can view all downloaded YouTube Music songs.
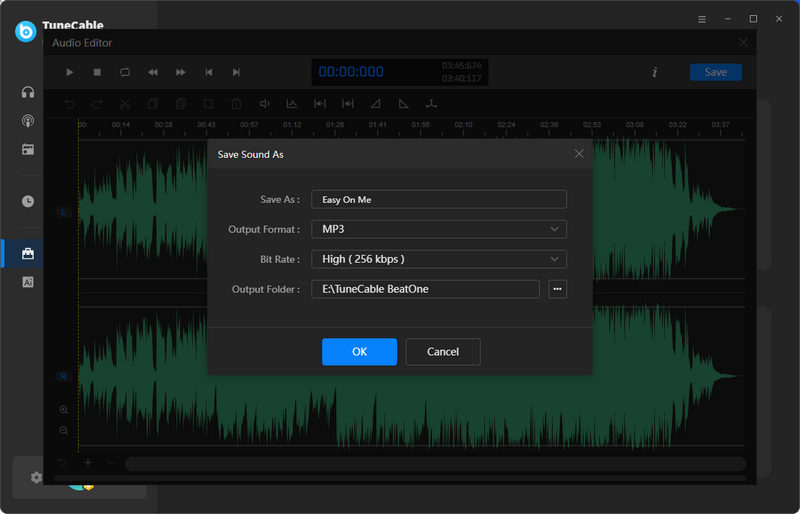
Step 1 Click "Tools" in the left menu bar and select "Audio Editor".
Step 2 Click on the "Open" button and find the downloaded YouTube Music audio files on your local PC. You can edit the song according to your preferences. For example, you can select and delete unwanted clips, insert silent clips, turn down the volume, etc.
Step 3 After editing the audio according to your needs, click "Save" to finish. You are allowed to rename the song and set the output format (MP3, M4A, FLAC, WAV, OGG, AIFF), bit rate, and output folder before exporting the song. Then, you can follow the steps in part 3 to add the downloaded YouTube Music to CapCut.
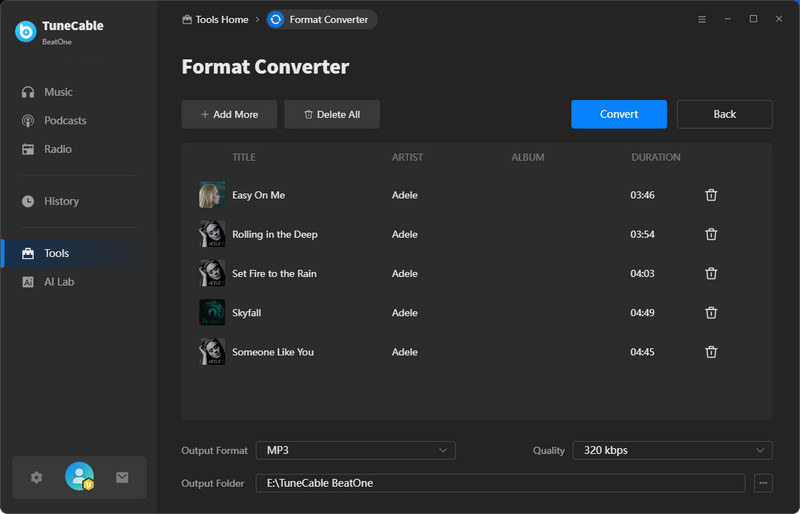
Step 1 Go to the "Tools" section and choose "Format Converter". Click "+Add" to import the downloaded YouTube Music tracks or any other audio files in MP3, M4A, M4B, WAV, FLAC, OGG, AIFF, or M4R format.
Step 2 Move to the lower area, select an output format, sound quality (128kbps, 256kbps, 320kbps), and output path. You can convert audio files to MP3, M4A, WAV, FLAC, OGG, or AIFF format. After modifying all the parameters, click on "Convert" to start the conversion.
Now, it's time to add the prepared YouTube Music songs to CapCut for video editing!
According to different applicable devices, CapCut respectively launched apps that are compatible with Windows, Mac, iPad, iPhone, and Android, and an online editor that does not require installing the app and runs on any browser. The interface and functions of the desktop app are basically the same. Similarly, the interface and functions of the CapCut app for Android, iPhone, iPad, and other mobile devices are basically the same, so we group them together into 2 catalogs and explain them respectively as follows:
Step 1 Download and install the CapCut app on your Windows or Mac computer. Launch the app and log in to your CapCut account. Then, click "Create project" to create a new video editing project.
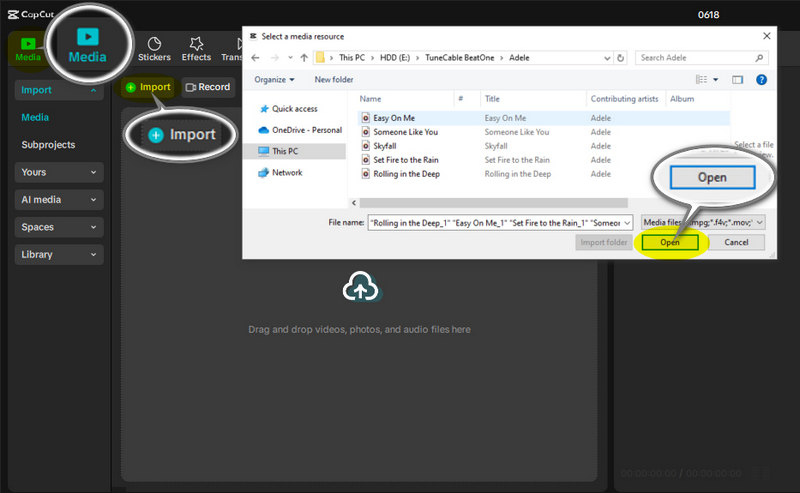
Step 2 Click "Media" in the upper left corner. Then, find the "+Import" button in the upper left panel and click it. In the pop-up window, locate the downloaded YouTube Music local file. Finally, click "Open" to complete the import.
Step 1 Move the downloaded YouTube Music tracks to your mobile device.
Step 2 Launch the CapCut app on your mobile device and log in to your account. Find "New project" at the top of the software interface and tap on it to create a new editing project. Choose a video on your local device and tap on "Add" to start video editing.
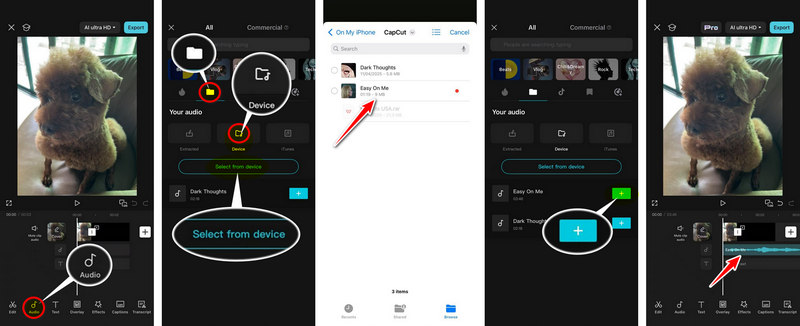
Step 3 Tap on the "Audio" button on the bottom menu bar. Then, tap on the folder icon and choose "Device" > "Select from device". Choose the YouTube Music files you want to add to CapCut and click "Open". In this way, the YouTube tracks have been imported to CapCut now.
Step 4 Click on the "+" icon to add the audio to the audio track for editing.
There are several possible reasons:
YES. You need to use TuneCable BeatOne to download the music from YouTube Music to your local computer first, and then import it to CapCut.
In addition to adding music to CapCut by importing local music files, there are also other ways as follows:
Mainstream formats such as MP3, WAV, M4A, AAC, FLAC, etc. are all available. If you would like to download music to these formats, you may turn to TuneCable BeatOne.
Check if the audio file is damaged, or try changing the format (e.g., use MP3 instead). Make sure CapCut is updated to the latest version.
This article covers a specific guide on how to download the YouTube Music tracks that you need to import into CapCut, the steps on how to import audio into CapCut on various devices, and the FAQs you may encounter in the process. We believe that you will successfully add YouTube Music to CapCut after reading the article. TuneCable BeatOne is an indispensable tool to help you complete this task. With TuneCable BeatOne, you can open up a variety of ways to apply these music files. Whether you want to import the downloaded music to CapCut for video editing or transfer it to a USB for other multi-purpose use, TuneCable will make this happen. Click the button below to install it for a free trial now!
 What's next? Download TuneCable BeatOne now!
Ava Morrison | Senior Writer
TuneCable BeatOne - All-in-one Music Solution

