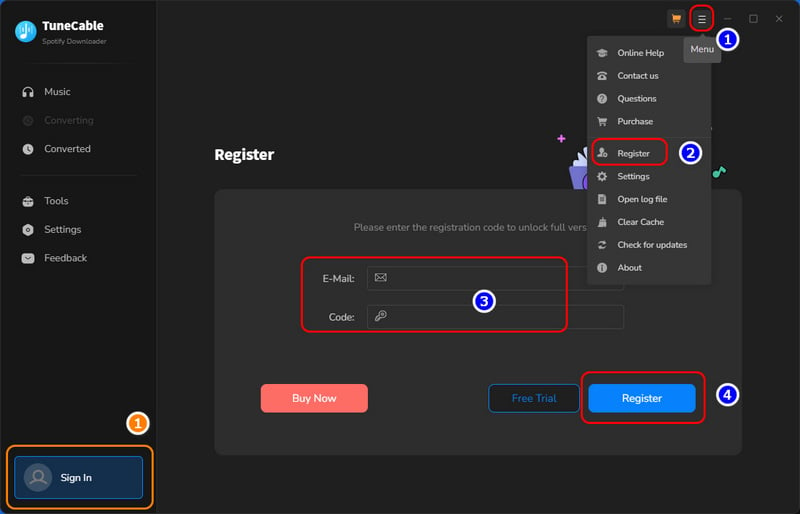
[1] Run TuneCable Spotify Downloader and select the "Register" tab in the lower left corner, you will get the registration interface.
[2] Copy and paste the registration Email and Code you have received from the email into the registration dialog. Then click the "Register" button.
[1] First, check if you have downloaded the right program.
[2] The registration code is case-sensitive. Please make sure you don't add a blank at the beginning or the end of the word. Simply copy and paste the Email address and Code into the registration dialog.
[3] Check to see if you purchased with an incorrect email, such as a letter missing from your email address, or mixing up with another email address.
[4] Depending on your auto-renewal subscription plans, your license will be updated every quarter or every year. The renewal license will be sent to you by email, please check your email, then you need to go to the top menu, then click "Register > Change Account" to register for the program again with the new license.
[5] If you have followed all the instructions but still get the failed message, please contact our support team via [email protected] for help.
TuneCable trial version only allows trial users to convert the first 1 minute of each song for sample testing. To unlock this restriction, please purchase a license.
TuneCable Spotify Downloader (Win/Mac version) offers MP3, AAC, WAV, FLAC, AIFF, and ALAC format for outputting. TuneCable Spotify Downloader (Android version) offers MP3, AAC, WAV, and FLAC format for outputting.
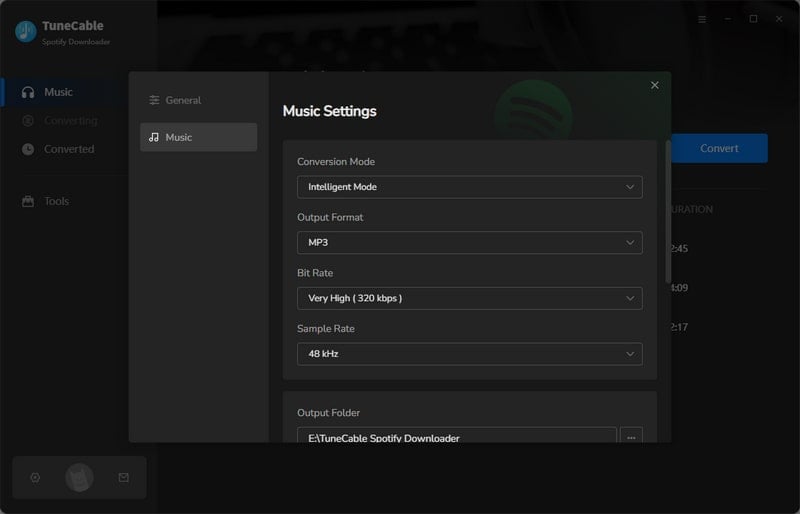
Intelligent Mode is a combination of Spotify Record/Web Download and YouTube Download. When you choose "Intelligent Mode" in TuneCable setting, the conversion rate would be increased a lot thus you can get the Spotify tracks as needed.
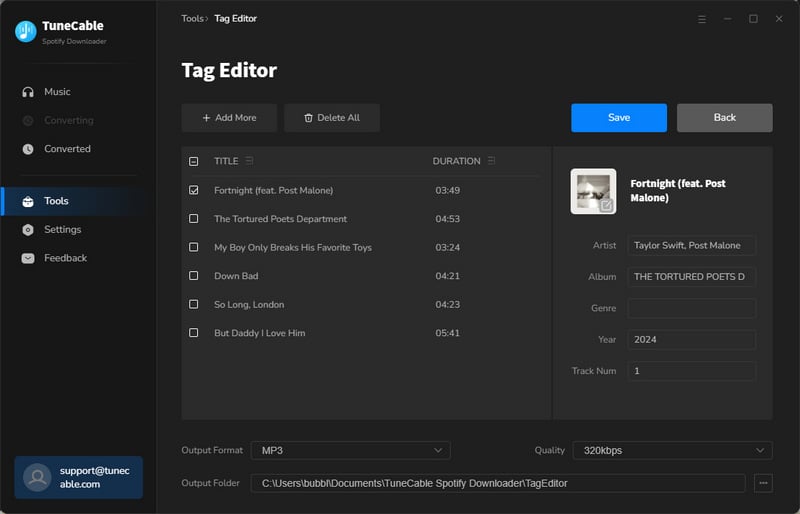
[1] Navigate to the Tag Edit tool on the Tools interface. Drag and drop your local audio files to TuneCable. The "+Add" button also allows you to upload your local files.
[2] TuneCable will show the tags on the files. You can change Artwork, Title, Artist, Album, Genre, Year, and Track Num according to your need. Then click "Save" to apply all changes.
TuneCable Spotify Downloader also supports to convert the normal music files to MP3/M4A/WAV/FLAC/OGG/AIFF format.
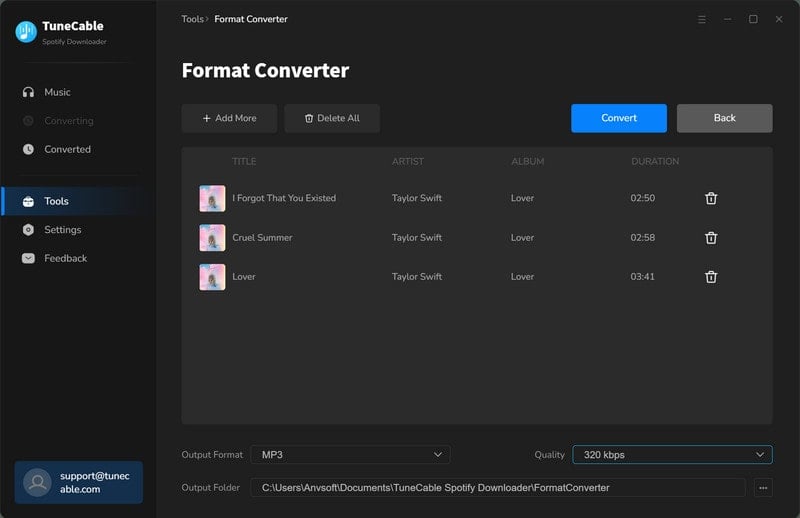
[1] From the "Tools" page, choose the Format Converter option. You can add music to the interface by clicking the "+Add" button or by manually dragging and dropping them. MP3, M4A, M4B, WAV, FLAC, OGG, AIFF, and M4R are among the output formats that are supported.
[2] Select the output format, sound quality (128kbps, 256kbps, 320kbps), channel (Mono, Stereo), and output path. Then click "Convert" to start the conversion.
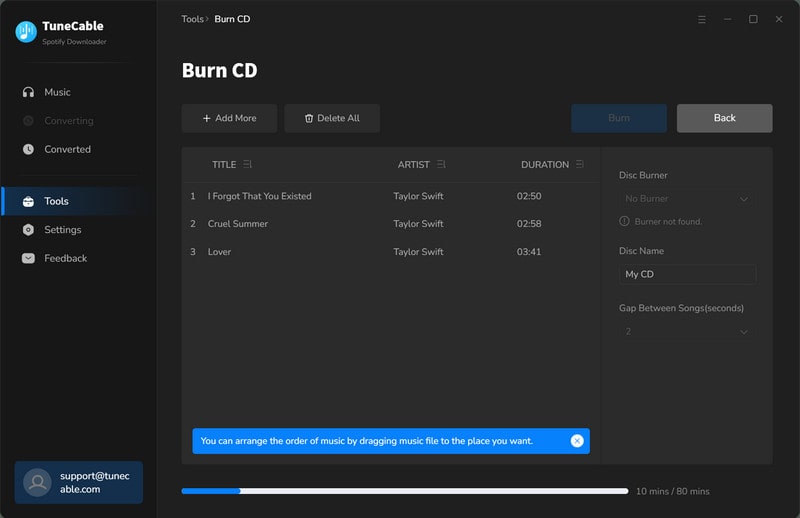
The tool Burn CD on TuneCable Spotify Downloader for Windows version allows you to use TuneCable directly to burn your songs to CD, and you don't have to find other programs. You can get the tool from the "Tools" module. You can also head to the "History" module, select the icon with four squares above the songs, and select the "Burn CD" option.
[1] Once you have clicked into the Burn CD tool, you can drag and drop your favorite songs into the margins or select the "+Add" button to add them. If you get the tool from "History", select the downloaded songs first and then select the "Burn CD" tool, it will enter the next step.
[2] Then you can customize the name of the disc as well as the gap between songs. You should note that you can add a maximum of 80 minutes of songs in total. Click on "Burn" to start the progress.
After the conversion is completed, head to the "History" tab, select the target songs and click on the square menu icon then select the option of "Export to iTunes". On the popup, you can name the playlist and then select "Start exporting".

Before converting, you can choose to sort the output music files into folders by "None", "Playlist", "Artist", "Album", or other provided options from Output Organized in Settings, so that the files would be organized properly.
1. In lower left of TuneCabe main interface, access "Settings".
2. Under "Output File Name", retain only "Playlist Index" and "Title".
3. Select "Playlist" in the "Output Organized" setting.
1. Switch to "Spotify App" and click "Open App" in TuneCable.

2. Make sure to log in to your Spotify Premium account within the Spotify app and enable "Lossless" quality in the "Settings" section.
3. Choose "Record Mode" as the conversion mode and select "Recommended" as the output format in TuneCable.
TuneCable will export the songs with the Lossless audio quality and format kept.
[1] Please check if you are using the latest version of TuneCable and music app. If not, please download the latest version through the download center
[2] Please go to the top right, click the "Menu" and choose "Clear Cache".
[3] Please go back to the start-up page and choose to record from the app or web player. Switch to another recording source.
[4] Please go to the "Settings" tab and go to "Conversion Mode". Then try different conversion modes.
[5] Please check if you can play the song on Spotify Music app or Spotify Music web player in Chrome like you normally do.
[6] If you are using Bluetooth or other device to connect your computer, please break the connection.
If the solutions above are not effective, please email support@tunecable for further help.
Cause: Your Spotify Music account is logged in and playing music at the same time on multiple devices.
Solution: Please make sure that your Spotify account is used only on your computer while in conversion.
Cause: Failed code 1010, 1700-1702 mean you are encountering errors like query no match, query failure, download failure under "YouTube Download" conversion mode.
Solution: Please use Record Mode from Conversion Mode in Settings.
Cause: The current PC has no audio output device and the Spotify Music app cannot play music normally, resulting in conversion failure.
Solutionw:
1. Please check whether the audio output device is connected properly.
2. Check whether the song can be played normally in the Spotify Music app.
3. If everything is normal, try to convert again.
Cause: Failed code 4000-4006, 4100-4105 means the input/output path does not exist, the program fails to create the output files or the name of the output path is too long, or need authorization to create a folder.
Solution: Run TuneCable as an administrator, go to the "Setting" window, set a different output path, and choose "None" under "Output Organized" for a try.
For Failed 4003, please change the output path to a disk that has much space left.
Cause: Failed 4106 means the output file is too large to save into your FAT disk.
Solution: Please choose another output path apart from FAT disk.
Sorry to hear that your Spotify account has been suspended. We explained the problem in detail. For this issue, please check Spotify Account Suspended.
To re-gain the Spotify suspended account, please check this page.
You've selected either "Intelligent Mode" or "YouTube Download" for music conversion. "YouTube Download" gets music from YouTube. "Intelligent Mode" switches sources based on network, falling back to YouTube if the original source is unavailable. For downloading only from the original source, please change "Conversion Mode" to "Record Mode".
Upon choosing a lossless output format (WAV, FLAC, AIFF, or ALAC), the Bit Rate option becomes inactive, reflecting the fact that these formats automatically encode audio at their optimal, uncompressed bit rate, thereby ensuring maximum audio quality without the need for manual bit rate adjustment.
YES. For more details about how to use TuneCable Spotify Downloader for Android, you may refer to this tutorial.
This prompt indicates that the song requires a logged-in account on the source platform for conversion. Please return to the Spotify web player window, click the "Log In" button (typically in the top-right corner), complete the login process, and then add the song to convert again.

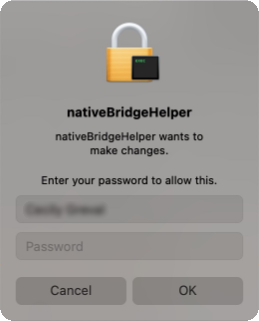
NativeBridgeHelper is a background helper process in macOS. Its primary role is to enable Macs with M-series chips (ARM architecture) to run applications originally developed for older Intel-based Macs (x86 architecture). It is normal that the "nativeBridgeHelper" prompt pop up when you are running the Mac version of our program. When you see it, please enter your computer password to authorize the program to proceed.
Please contact us at [email protected], tell us which problem are your encountering and provide us with detailed info like Mac OS, Spotify version, and program log files for analysis. You can submit your problem through 'Menu' > 'Feedback' and attach the log files.